Archive for the ‘Restoration’ Category

1959 Convertible Top Frame

Monday, February 1st, 2010

Work on the convertible top frame is continuing to move along.  Greg splashed a little paint on all the convertible top supports…

The Top Irons have come back from the Plater…

…and below are a few sequence shots of the convertible top frame coming together:

All new pump, top cylinders and hose set came from Hydro-E-Lectric (www.hydroe.com)

Here’s the new Pump Motor is back in its rightful home…

New Top Cylinders and Hoses are looking good…

Going Down…

The wiring is also progressing. Greg cleaned up the original harness and after going over every inch of it decided it was still in overall excellent condition. I got the following report:

“I did some further evaluation on wiring harnesses today. So far so good. On the body harness the only thing I saw was that the plug at the power top switch is burnt. I’ll fix that. The rest of the power window harness looks pretty good other than the usual problem in the door jamb area. The harness looked just fine on the outside but as you can see in the picture that the insulation is cracked. From previous experience I know all about that game! You can’t hide from the old Cook!”

Here are a few shots….

Here is a close up of the burnt plug for the power top switch…

And another of the cracked insulation at the door jamb…

Starting to bring the wiring into the engine compartment…

The seats are also moving along… check out the bottom springs on one of the buckets

Here’s a close up of the original tag…

Also received the custom-dyed leather hyde from SMS along with a roll of matching vinyl…

All loaded up for delivery to the upholsterer…

Well, the end of another installment…I think I can begin to see a faint glimmer of light at the end of the tunnel!

_________________
~ Tom Sidoti
1959 Buick Electra 225 Convertible

Wheel Covers and So Much More…

Monday, February 1st, 2010

Well, the big news is Greg has finally installed the wheel covers Very Happy

…and even threw a few parts into the engine bay like wipers and A/C housings

The dash is moving right along…the old firewall insulator was a mess so a new one came from Quite Ride Solutions (http://www.quietride.com/).  A good quality  firewall insulator is a necessity to prevent  engine heat and noise.

The nasty non-working power antenna was sent out to Klaus Wojak (828-898-9338) for a rebuild…

…and came back with a shiny new shaft and hopefully nicely working innards…

Also got some new chrome back…now that’s a horn ring…

The new date-coded EZ-Eye tinted windshield and all the bright moldings are installed. We used a “Steele” windshield gasket that Greg said fit just fine…

Now on to the door…chrome, stainless and hardware…

I asked Greg the steps to line up the doors, windows and front end and got the following reply…

“First thing is to rough the door adjustment. The next step is to install the vent window assemblies. Then install the door glass and the quarter window glass. Once those 6 pieces line up properly check and see where the cowl is. Hopefully the vent windows will have a nice gap to the back side of the windshield frame. Only then can the final adjustment on the door be made. It’s a long process when a car is totally blown apart, you have to do it in the correct sequence otherwise it’s one step forward, two steps back and it never fits anyway.

Next up is the top frame, Sometimes its hard to get two doors, six windows, and a top frame with a mind of it’s own to play together in a friendly manner. Big problem is that you can make perfect adjustments between the window frames and the top frames and temporarily install the top rubbers and get a perfect fit. BUT when you put on the top fabric and pull it tight it upsets those adjustments! See how much fun this is??? Smile But not to worry, I can make it happen, just takes time to sort it all out.

The fenders come last, adjusted to the doors. Ideally there should be a slight gap between the front of the rocker panel and the rear edge of the fender. That’s a good starting point. Then you shim the radiator support up or down to get a nice even gap up the front edge of the door. But don’t get ahead of yourself here! you still have to get that hood into the opening and have an even fit across the front edge. See, this is easy!

It’s not rocket science but it’s a matter of getting everybody working together. As the old story goes, for every action there is a reaction. Pretty much the same here. Move a panel to make a nice gap, something else changes. It’s just patience patience patience. I’ve seen some potentially beautiful cars that were just crap because of bad fits. Some things just can’t be helped, but windows, doors and front ends can usually be made to work with patience.”

Whew!
________________

~ Tom Sidoti
1959 Buick Electra 225 Convertible

Dash Stripping and Painting & New Door Panels

Tuesday, January 26th, 2010

Cruising right along…

After stripping all of the dash parts…

Greg managed a spot-on match with the paint color…

New door panels and pump covers have also just arrived from SMS.

_________________
~ Tom Sidoti
1959 Buick Electra 225 Convertible

1959 Buick Automatic Heat Option

Sunday, January 24th, 2010

I’ve mentioned the Automatic Heat option several times so I guess a little background on this option is in order.

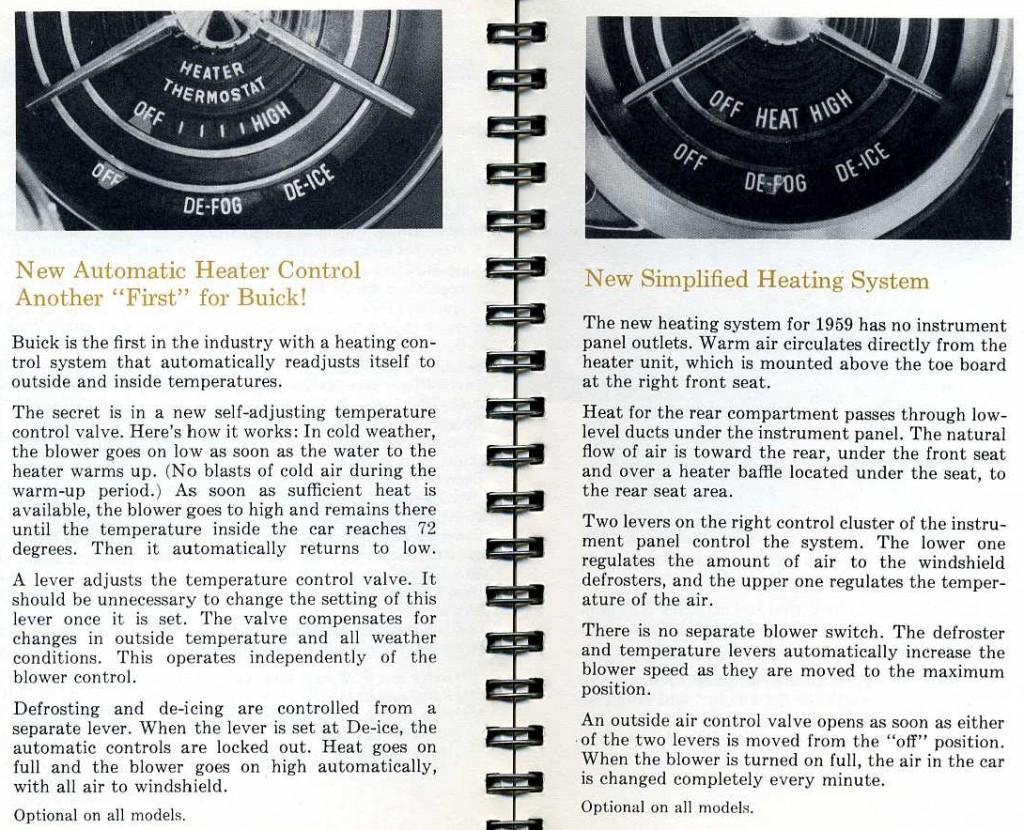
Few people are aware that Buick engineers cleverly designed the world’s first climate control system for their 1959 vehicles.  “Automatic Heat” was an extremely rare option that was available on all models and could even be combined with Air Conditioning.  This intricate system was not shared with any other GM Division (not even Cadillac) and was a one-year only option.  Cars equipped with this unique feature are easily identified by the prominent “Heater Thermostat” wording displayed in a reddish orange color on the right side instrument panel pod (see previous post).

Automatic Heat functioned similar to modern day climate control, only it was accomplished without modern electronics.  Because the system was designed to be entirely automatic, cars with this option do not have a manual blower switch.  The idea was to set the dash mounted thermostat control lever to a position that provided a comfortable cabin temperature and let the system do the rest.  The feature was so sophisticated that it prevented the blower from allowing cold air to enter the cabin.

The system utilized a complex network of electric water and air thermo switches combined with multiple vacuum diaphragms and tubing.  The water thermo switch was installed directly into one heater hose in the engine bay and it monitored water temperature.  Two air thermo switches were required, one detected inside air temperature and the other outside air temperature.

Upon starting the car the system was automatically energized and the water thermo switch would monitor water temperature until it hit approximately 100 degrees F.  If the outside air thermo switch detected a temperature below the operator’s system setting, it would work in tandem with the water thermo switch to complete the circuit and automatically turn the blower on at low speed (this sequence prevented the blower from operating before the heater core was warm thereby preventing cold air from blowing into the cabin).  Once the water temperature reached approximately 120 degrees F, the water thermo switch automatically increased blower speed to high.  When the interior temperature reached approximately 73 degrees F (or whatever temperature the operator selected), the inside air thermo switch lowered the blower speed back down to low.  Unique integration components were added to the system for cars equipped with both the Automatic Heat and Air Conditioning options.

The heating/cooling system was so complex that the 1959 Chassis Service Manual contains six pages of diagrams detailing the multitude of different positions of the four vacuum diaphragms and how they direct airflow based on the dash control settings.  One interesting fact is that the 1959 Buick Owners Manual states, “On cars equipped with both air conditioning and heating, both units may be operated simultaneously; the air conditioning providing cool air for upper level while the heating system warms lower level.”

The system was not without its problems, the April 20, 1959 Buick Special Service Information Bulletin discusses an issue concerning the Automatic Heater option.   The bulletin references a new Automatic Heater Blower Control package to help refine system operation. The package included a newly designed Ranco heater valve that was much more sensitive, a new thermal switch design, new resistor, and all the necessary wiring. The new kit provided for three automatic blower speeds instead of two. With Low, Medium, and High speeds newly available, the kit allowed for more effective air temperature control and alleviated customer complaints of blower noise and excessive air outlet temperatures. Low and Medium speeds were used above 25 degrees F, and high was engaged below 25 degrees F.

All things considered, Automatic Heat was years ahead of its time and remains one of the most rare and unique options ever installed on a production Buick.  When properly maintained the system was known to provide years of trouble free service with reports of some 1959 Buicks still operating with the system performing flawlessly after 50 years…a true testament to Buick engineering!

Below is how the 1959 Buick Automatic Heat option system is described in the actual 1959 Buick Facts Book (Click on Picture to Enlarge).

________________
~ Tom Sidoti
1959 Buick Electra 225 Convertible